
Sending Surveys via Email Invitation
The Email Invitations option allows you to design and customize emails for your surveys, quizzes, and forms. You can enable tracking when sending our projects via email invitation and send reminders to those who’re yet to respond. You’ll be able to monitor email metrics for your campaigns, to see how well they’ve performed with your contacts.
To get started with this feature:
- Go to the Send section of your project
- Scroll to Send email invitations
- Open the Email tab and click Send by email (this button reads Add another campaign if you’ve already created an invitation campaign for this project before)
If you haven’t uploaded any contacts yet, click Upload contacts (or Manage contacts, if a campaign already exists) to import them first.
Subject and sender
Section titled “Subject and sender”First, you’ll need to fill out the subject and sender information for your email. This is the first step (Subject) when you compose a campaign.
In the Meta section, you’ll need to fill out the:
- Subject
- From name
- Reply email (the address replies will be sent to — chosen from your verified sender addresses)
- Physical address
Under Form invitation, select the project (survey, quiz, or form) to send with the email campaign. By default, the project you launched this campaign from will already be selected.
Under Anonymous send, leave Send anonymously off to keep tracking enabled (the default). Turn it on to disable tracking for this invitation.
To continue to the next section and start designing your email, click Next: Content.
Composing and designing your email
Section titled “Composing and designing your email”Your emails are created using a what-you-see-is-what-you-get block editor. You can drag and drop in one of the below block types to start building your content:
| Columns | Columns allow you to insert multiple blocks along the same row |
| Button | Add a button that takes recipients to another page |
| Divider | Place a divider to visually separate two blocks of content |
| Heading | Add a heading to your email body |
| Paragraph | Type text into these blocks |
| Image | Upload an image and place it in your email body |
| Menu | Add a menu with links to external pages |
| HTML | Insert an HTML block and customize it using HTML code |
By default, your email will be created with two paragraph blocks and a button.
There are several required fields in your email that cannot be removed, these include:
- Physical address: your own address.
- Unsubscribe link: allows users to opt-out of your mailing lists.
Block design
Section titled “Block design”Click any block in the email builder to edit their design individually. You will see different options for each content block type, but you will be able to change the padding of each content block.
For more information on what you can edit for each, click the links in the table of content blocks above.
Global design
Section titled “Global design”To edit the global design of your email, select Body in the left-hand icon rail (alongside Content, Blocks, and Dev). Here you can set:
| Global settings | Description |
|---|---|
| Text color | Set a default color for all text in your email |
| Background color | Set a background color for your email |
| Content width | Select the width of your email content |
| Content alignment | Align your text to the left or center |
| Font family | Choose a font for all text in your email |
| Font weight | Choose the default weight (e.g. Regular) for your email text |
| Preheader text | Write a short summary that follows the subject line when viewing an email in the inbox |
| Link color | Set a color for links in your email |
| Link underline | Choose whether links are underlined by default |
Previewing your email
Section titled “Previewing your email”You can view edit your content in both the Desktop and Mobile views to ensure your design is responsive on both types of devices. To switch between these, click the desktop or mobile icons in the bottom rights of the email builder.
 You can also click the eye icon to preview your email as your contacts would see it. There will be an option for switching between a mobile and desktop view above the preview.
Selecting contacts
Section titled “Selecting contacts”Once you’re finished creating your email and you’ve previewed it, click Recipients in the top right. This will take you to the different groups you’ve created for your contacts.
Select a group (or groups) to send your campaign to, the total number of recipients will be calculated at the bottom of the page for you.
From this section, you can also choose a Segment you’ve created or use the Advanced tab to filter your contacts before sending.
Whichever you’re finished selecting your contacts, click the Next: Review & Send to proceed to a review of everything you’ve done so far.
Review details and test
Section titled “Review details and test”From the review screen, you’ll be able to go back and edit anything you’ve done so far (Subject and sender, Content, Recipients each have their own edit icon), and preview your email.
Preview email
Section titled “Preview email”Click Preview email next to the image of your email content to trigger a pop-up containing the full HTML preview.
Once you’re finished reviewing, just hit Next: Schedule & Send.
Schedule & send
Section titled “Schedule & send”You’ll have two choices when sending an email invitation: send now or later.
Send now
Section titled “Send now”Choosing Now will schedule your campaign to be sent immediately. Click Send it now! to confirm — the email should be sent approximately 5 minutes after you hit send.
Send later
Section titled “Send later”Selecting Later will open a few more settings for you:
Here you can choose a date, time, and time zone to schedule to email.
Sending a reminder
Section titled “Sending a reminder”For each original invitation campaign, Remind non-responders creates one reminder campaign for contacts who have not responded. Once a reminder campaign exists, open it to finish preparing it or review its status; this action does not create a second reminder for that invitation.
To do this:
- Go to the Dashboard
- Click the project you wish to send a reminder for, then select Results
- Select Invitations in the Results left rail
If the project hasn’t used tracking yet, you’ll instead see an explanation of the feature — you’ll need to enable tracking on an email invitation campaign first.
- Find the original invitation campaign and select Remind non-responders to open the reminder campaign for preparation. If a reminder already exists, open that campaign instead.
- Change Subject, Content, and edit Recipients accordingly
- Click Schedule & send
- Choose to send it Now or Later
View sent emails
Section titled “View sent emails”There are two ways of viewing sent emails, via a project’s Send section or via Mailings in the left-hand navigation.
Survey invitations
Section titled “Survey invitations”To view a project’s invitations:
- Click a project in your dashboard
- Select Send
- Scroll to Send email invitations
Once you’ve created at least one campaign for the project, this section lists your Existing invitation campaigns, with a Complete sending process button for any that are still drafts. Manage contacts and Add another campaign buttons sit below the list.
Mailings
Section titled “Mailings”Clicking Mailings in the left-hand navigation will take you to a complete list of all the emails you’ve sent on the site. Each will contain the following information:
- Campaign type: Invitation or reminder.
- Project title: Name of the survey, quiz, or form sent.
- Campaign status: Sent or draft.
- Creation date: Date when the email was created.
Survey invitation response rates
Section titled “Survey invitation response rates”There are also two ways you can access the statistics for your email invitations, via your survey report and via your mailings reports.
Survey reports
Section titled “Survey reports”When you go to the Results section of your survey (quiz or form), the campaign stats for your email invitations will appear above your question results.
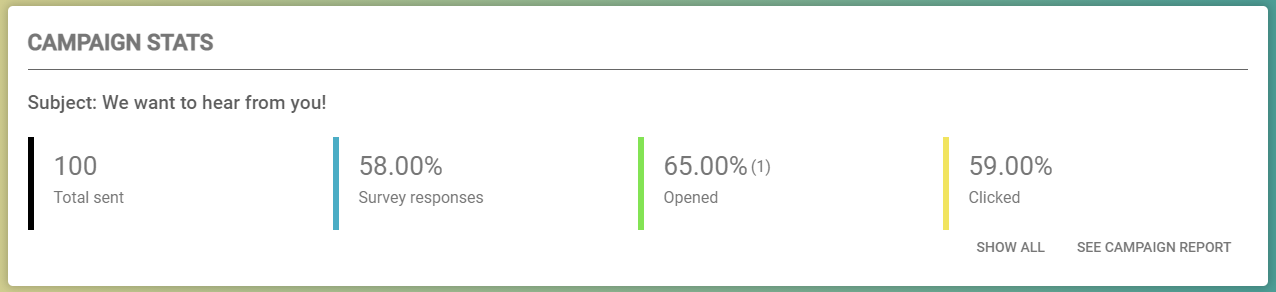
To proceed to the full report for your email invitations, just click see email campaign.
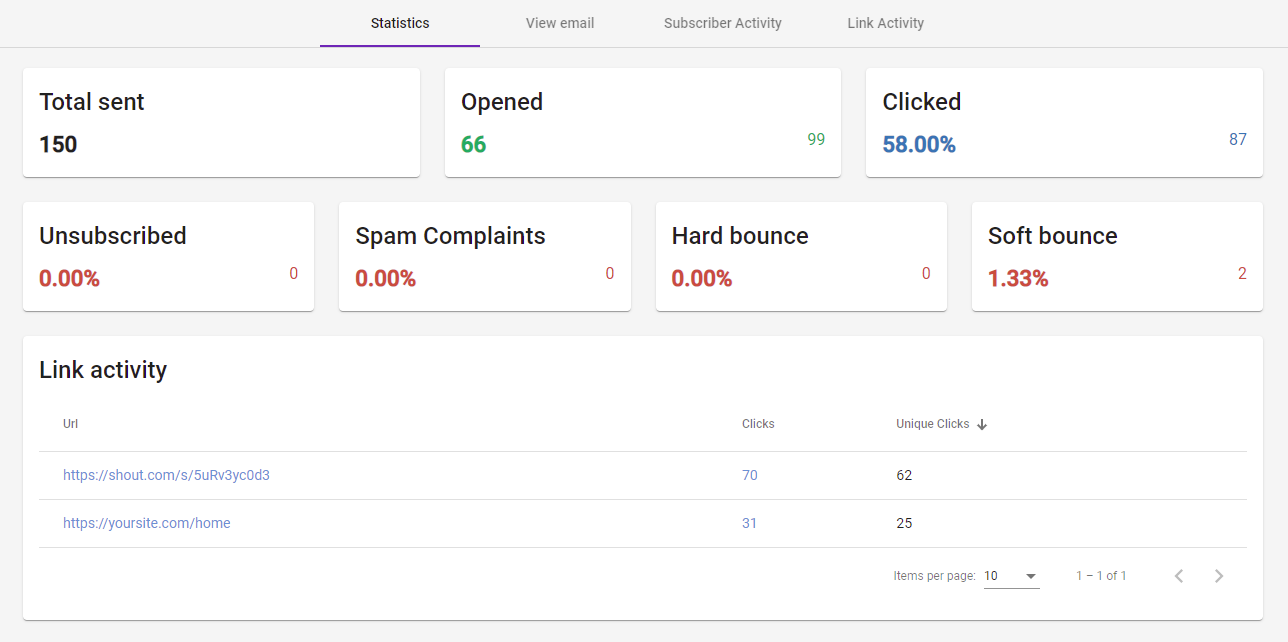
Mailing reports
Section titled “Mailing reports”To get to the report of any other email campaign you’ve sent, all you need to do is:
- Click Mailings in the left-hand navigation
- Click a campaign
- Select Report