
Webhooks
Supercharge Your Surveys: A Guide to Using Webhooks
Section titled “Supercharge Your Surveys: A Guide to Using Webhooks”Webhooks are a powerful way to automatically send real-time data from your surveys to other applications the moment an event occurs. Instead of manually exporting data or waiting for scheduled syncs, webhooks push your survey responses exactly where they need to go, instantly.
Here is how to configure a webhook on our platform and connect it to your favorite automation tools like Zapier or Make.com.
Webhooks are account-wide, then subscribed per form
Section titled “Webhooks are account-wide, then subscribed per form”Webhooks belong to your whole account, not to a single form. You create and manage them in one place, then choose which individual forms should trigger each one. There are two ways to get to that shared list:
- Developers > Webhooks: Click your avatar, choose Developers, then open the Webhooks tab.
- A form’s Send page: Open a form, go to the Send tab, and scroll to (or click) Webhooks in the left-hand section list. The Webhook subscribers panel shows either “You have no webhooks configured” (if your account has none yet) or a checklist of your account’s existing webhooks with Select the webhooks this form should send to — tick the ones this form should notify.
Both entry points show the same account-wide Webhooks list (the Send page opens it as a dialog; the Developers page shows it as a tab), listing any webhooks already configured (name, Active/Inactive status, and Test, delete, and edit actions for each) plus an Add Webhook button.
You don’t need to publish a form first — the Webhooks panel and the account-wide list are both available on draft forms — though a form only actually fires an event once it is live and receiving responses.
How to Configure a Webhook
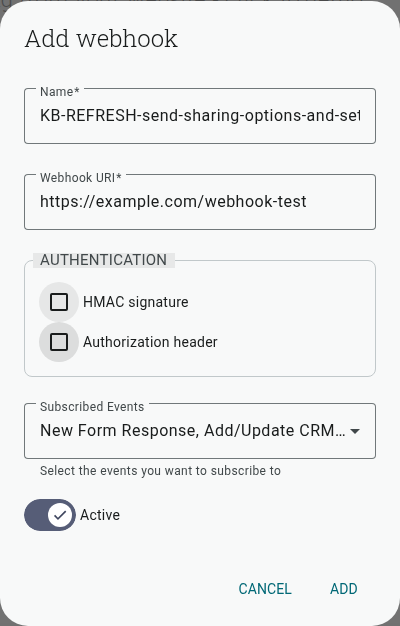
Section titled “How to Configure a Webhook”Click Add Webhook to open the Add webhook dialog and fill in the following details:
- Name*: Give your webhook a clear, descriptive name (e.g., “Zapier - Lead Generation Form”).
- Webhook URI*: This is the destination URL where our platform will send the data. You will get this unique URL from the app you are connecting to (like Zapier or Make).
- Authentication (optional): Two independent checkboxes let you secure the payload:
- HMAC signature — reveals a required Signing secret field. We compute an HMAC-SHA256 of the payload using your secret and send it as the
X-Signatureheader (base64-encoded), so the receiving app can verify the request came from us and wasn’t tampered with. - Authorization header — reveals a Header name dropdown (preset options:
Authorization,X-Api-Key,x-make-apikey,X-Auth-Token,X-Webhook-Key) and a Header value / token field. If you’re sending a Bearer token, include theBearerprefix yourself in the value.
- HMAC signature — reveals a required Signing secret field. We compute an HMAC-SHA256 of the payload using your secret and send it as the
- Subscribed Events: A multi-select dropdown — you can subscribe a single webhook to more than one event at once. The available events are New Form Response, Add/Update CRM Contact, and Unsubscribe Contact.
- Active: The toggle defaults to on; switch it off to keep the webhook configured but paused.
Name and Webhook URI are the only required fields — Subscribed Events and Authentication are optional. Once everything is filled out, click Add to save your webhook, then go back to the form’s Send → Developers tab and tick its checkbox under Webhook subscribers so that form actually sends to it.
Deleting a webhook (from the trash icon in the Webhooks list) removes it — and its subscription — from every form it’s attached to, since it’s a single shared record, not a per-form copy.
Connecting to Zapier
Section titled “Connecting to Zapier”Zapier makes it incredibly easy to catch our webhooks and route your survey data to thousands of other apps (like Google Sheets, Slack, or your CRM).
- Log into Zapier and click Create a Zap.
- For your Trigger step, search for and select Webhooks by Zapier.
- Choose Catch Hook as the Event and click Continue.
- Zapier will generate a unique Webhook URL. Copy this URL.
- Head back to our survey platform and paste that link into the Webhook URI field in your webhook settings.
- Submit a test response on your survey (or click Test next to the webhook in the Webhooks dialog to fire a sample payload immediately), then test the trigger in Zapier to confirm the data is successfully flowing.
Connecting to Make.com
Section titled “Connecting to Make.com”Make.com (formerly Integromat) is another fantastic platform for building advanced, visual workflows using your survey data.
- Log into Make.com and Create a new scenario.
- Click the plus icon to add your first module, search for Webhooks, and select it.
- Choose Custom webhook as your trigger.
- Click Add to create a new webhook hook, give it a name, and hit Save.
- Make will generate a unique URL address. Copy this address to your clipboard.
- Paste this link into the Webhook URI field on our survey platform.
- Submit a test response to your survey (or click Test next to the webhook in the Webhooks dialog) so Make can catch the payload and successfully determine the data structure for the rest of your scenario.