
Import contacts from a file
Use this page when you already have a list in a spreadsheet or file and want to paste or upload it into Shout Contacts. If the list should be read directly from Google Sheets, a customer database, a support system or another connected service, use Import contacts from an app instead.
There are three ways to get contacts into Shout:
- Paste or upload a list — covered below.
- Import from an app you already use — read contacts directly from a connected service. See Import contacts from an app for that separate route and Import sources and limits.
- Collect them with a form — see Collect contacts with a form.
Add contacts
Section titled “Add contacts”To paste or upload contacts to your list:
-
Go to Contacts in the top navigation.
-
Click the + icon above the contact list.
-
Select Bulk import.
-
Paste your list of contacts into the Paste Your List field (along with any custom fields). With Import on paste ticked (the default), this starts the import automatically as soon as you paste.
-
Click Import contacts.
-
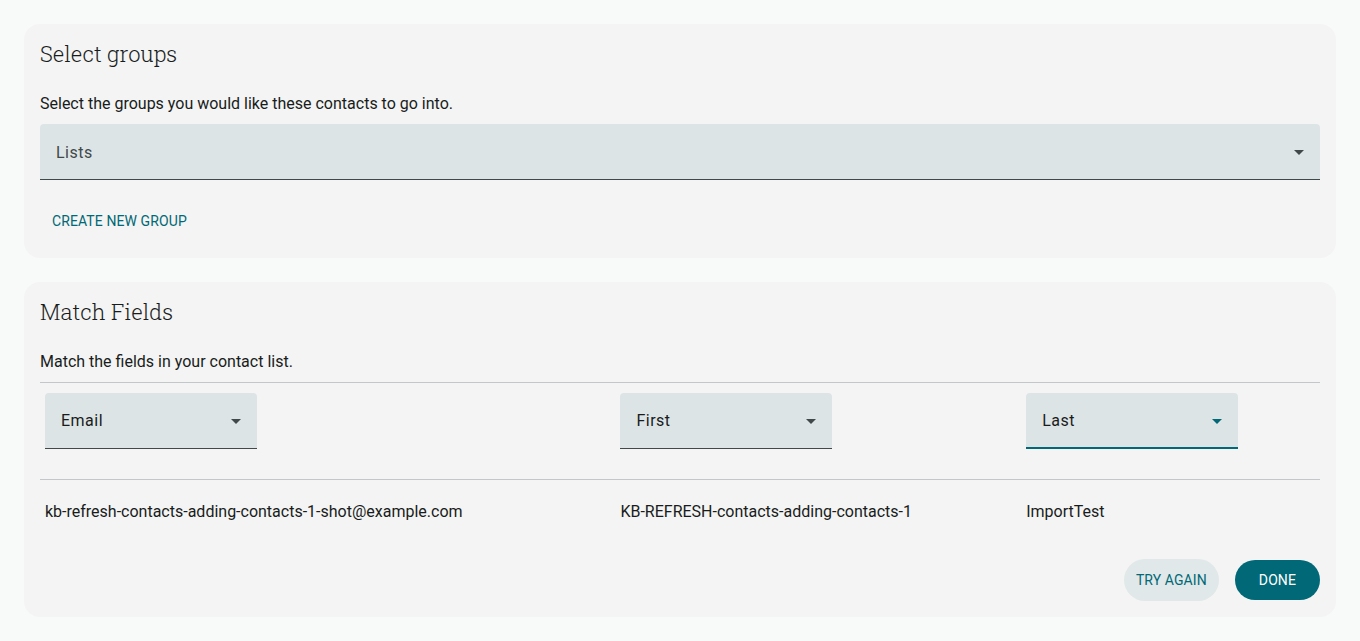
Under Select groups, choose which group(s) you’d like to add these contacts to (or click Create new group).
-
Under Match Fields, use the dropdown above each column to match it to the correct field in Shout.
-
Click Done.
You’ll see a summary showing New contacts added, Contacts updated, and Contacts not added. Duplicates are removed automatically — if you import a contact whose email address already exists in your list, their existing record is updated rather than duplicated.
Custom fields
Section titled “Custom fields”When importing contacts, you can add more information than just an email address.
Format your pasted list like this, with one contact per line:
Email | First name | Last name | …
In the Match Fields step, match each extra column to one of Shout’s standard fields:
- Email — required.
- First and Last.
- Full name — use this when your list has a single name column instead of separate first and last names. Shout splits it for you, and handles “Smith, John” as well as “John Smith”. Don’t map Full name and First/Last at the same time; pick one or the other.
Everything else — company, phone number, country, and any attributes you have added yourself — is matched from your account’s attribute list. See Manage custom fields for how to add one.
Columns you don’t match are ignored, and importing never creates a new attribute for you — add it first if you need somewhere for that column to go.
You must ensure that when you paste contacts, the columns are in the same order for every contact in the list.
Group contacts
Section titled “Group contacts”To create a group:
- Go to Contacts in the top navigation.
- Click the List dropdown near the search bar (it reads “List All” by default).
- Click New list.
- Enter a Group name.
- In the Lawful basis of processing dropdown, select a lawful basis for the processing of this group’s data. This defaults to No consent.
- Add a Full description for the group (optional).
- Click Save.
The Lawful basis of processing dropdown gives you the different legal bases for processing data under GDPR (No consent, Explicit consent, Contract, Legal obligation, Vital interests, Public task, Legitimate interests), so you can group your contacts accordingly for easy review and reference. Don’t worry, you can add contacts to multiple groups.
For example, if you have a list of Newsletter Subscribers, you can create a group for these but also add them to an Explicit Consent group. The Newsletter Subscribers group can act as an active list that serves a specific purpose, whereas the Explicit Consent group acts as a master list of consent-based contacts from all other groups.
Once you’ve uploaded and grouped contacts you can use segments to further personalize your lists.
Edit contacts
Section titled “Edit contacts”You can edit contact information after they’ve been added. To do this:
- Go to Contacts.
- Find your contact using the search bar.
- Click the contact (this opens their profile).
- On the Overview tab, click the pencil icon next to the field you want to change — name, email, phone number, or organisation.
- Update the value and press Enter to save.
Open the Details tab on the contact’s profile to see their full set of fields, and click the group chip (for example Marketing) to add or remove them from groups via the Select groups for contact dialog.